I recently had some fun trying to assign and remove some user licenses while using Microsoft Graph API version 5 within a Blazor Server App.
Below are some short code examples of the payloads that worked for me. The format and values of the payload are pretty strict otherwise you get errors thrown like:
License 00000000-0000-0000-0000-000000000000 does not correspond to a valid company License.Or...
One or more parameters of the operation 'assignLicense' are missing from the request payload. The missing parameters are: removeLicenses.The GUIDs for different licenses can be found here along with a link to a csv version.
Assign E3 license.
    var requestBody = new AssignLicensePostRequestBody
    {
        AddLicenses = new List<AssignedLicense>
        {
            new AssignedLicense
            {
                DisabledPlans = new List<Guid?>
                {
                },
                SkuId = Guid.Parse("6fd2c87f-b296-42f0-b197-1e91e994b900")
            }
        },
        RemoveLicenses = new List<Guid?>
        {
        }
    };

    var result = await graphClient.Users[The unique identifier of user].AssignLicense.PostAsync(requestBody);
Remove E3 license.
    var requestBody = new AssignLicensePostRequestBody
    {
        AddLicenses = new List<AssignedLicense>
        {
        },
        RemoveLicenses = new List<Guid?>
        {
            Guid.Parse("6fd2c87f-b296-42f0-b197-1e91e994b900")
        }
    };

    var result = await graphClient.Users[The unique identifier of user].AssignLicense.PostAsync(requestBody);
Sometimes you want to have the Blazor <EditForm> take care of field validation but also want to be able to hide some required fields depending on other values.
In this example the IncludeCompanyName boolean toggles whether the company name field is displayed. If a required field is hidden and doesn't contain a value then the form will not submit.
So to get this to work I initialise the CompanyName property to a value (in this case 'Not specified') and then instead of binding the value of the IncludeCompanyName I use the onchange method to set its value and either set or clear the CompanyName value.
If IncludeCompanyName is checked I clear CompanyName so Blazor takes care of required field validation, and when IncludeCompanyName is unchecked I put a value into CompanyName so that it will pass validation behind the scenes, but then clear it out (or do whatever I want) in the Submit method.
Paste the following code into a Razor component to see how the example works.
@page "/demoform"
@using System.ComponentModel.DataAnnotations;
@using System.Text.Json.Serialization;

<EditForm Context="EditFormCtx" Model="@FormInfo" OnValidSubmit="Submit">
    <DataAnnotationsValidator />

    <div class="row">
        <div class="col">
            <label class="form-label">Full name
                <InputText @bind-Value="FormInfo.FullName" class="form-control" />
            </label>
            <ValidationMessage For="@(() => FormInfo.FullName)" />
        </div>
    </div>
    <div class="row">
        <div class="col">
            <label class="form-label">Address
                <InputText @bind-Value="FormInfo.Address" class="form-control" />
            </label>
            <ValidationMessage For="@(() => FormInfo.Address)" />
        </div>
    </div>
    <div class="row">
        <div class="col">
            <input type="checkbox" checked="@FormInfo.IncludeCompanyName" @onchange="IncludeCompanyNameCheckboxChanged">
            <label class="form-check-label">If checked you can include your company name.</label>
        </div>
    </div>
    <div class="row" style="display: @(FormInfo.IncludeCompanyName == true ? "block" : "none")">
        <div class="col">
        <label class="form-label">Company name
            <InputText @bind-Value="FormInfo.CompanyName" class="form-control" />
        </label>
        <ValidationMessage For="@(() => FormInfo.CompanyName)" />
        </div>
    </div>
    <div class="row">
        <div class="col">
            <button type="submit" class="btn btn-primary mt-4">Submit</button>
        </div>
    </div>
</EditForm>

@code {
public class InfoToCollect
{
    [Required]
    [JsonPropertyName("FullName")]
    public string? FullName { get; set; }
    [Required]
    [JsonPropertyName("Address")]
    public string? Address { get; set; }
    [Required]
    [JsonPropertyName("IncludeCompanyName")]
    public bool IncludeCompanyName { get; set; }
    [Required]
    [JsonPropertyName("CompanyName")]
    public string? CompanyName { get; set; }

    public InfoToCollect()
    {
        CompanyName = "Not specified";
    }
}

public InfoToCollect FormInfo = new InfoToCollect();

public void IncludeCompanyNameCheckboxChanged(ChangeEventArgs e)
{
    // get the checkbox state
    FormInfo.IncludeCompanyName = (bool)e.Value;

    if (FormInfo.IncludeCompanyName)
    {
        FormInfo.CompanyName = "";
    }
    else
    {
        FormInfo.CompanyName = "Not specified";
    }
}

public async void Submit()
{
    // Submitting code...
    if(FormInfo.IncludeCompanyName == false)
    {
        FormInfo.CompanyName = "";
    }
        //... rest of submitting code.
    }
}
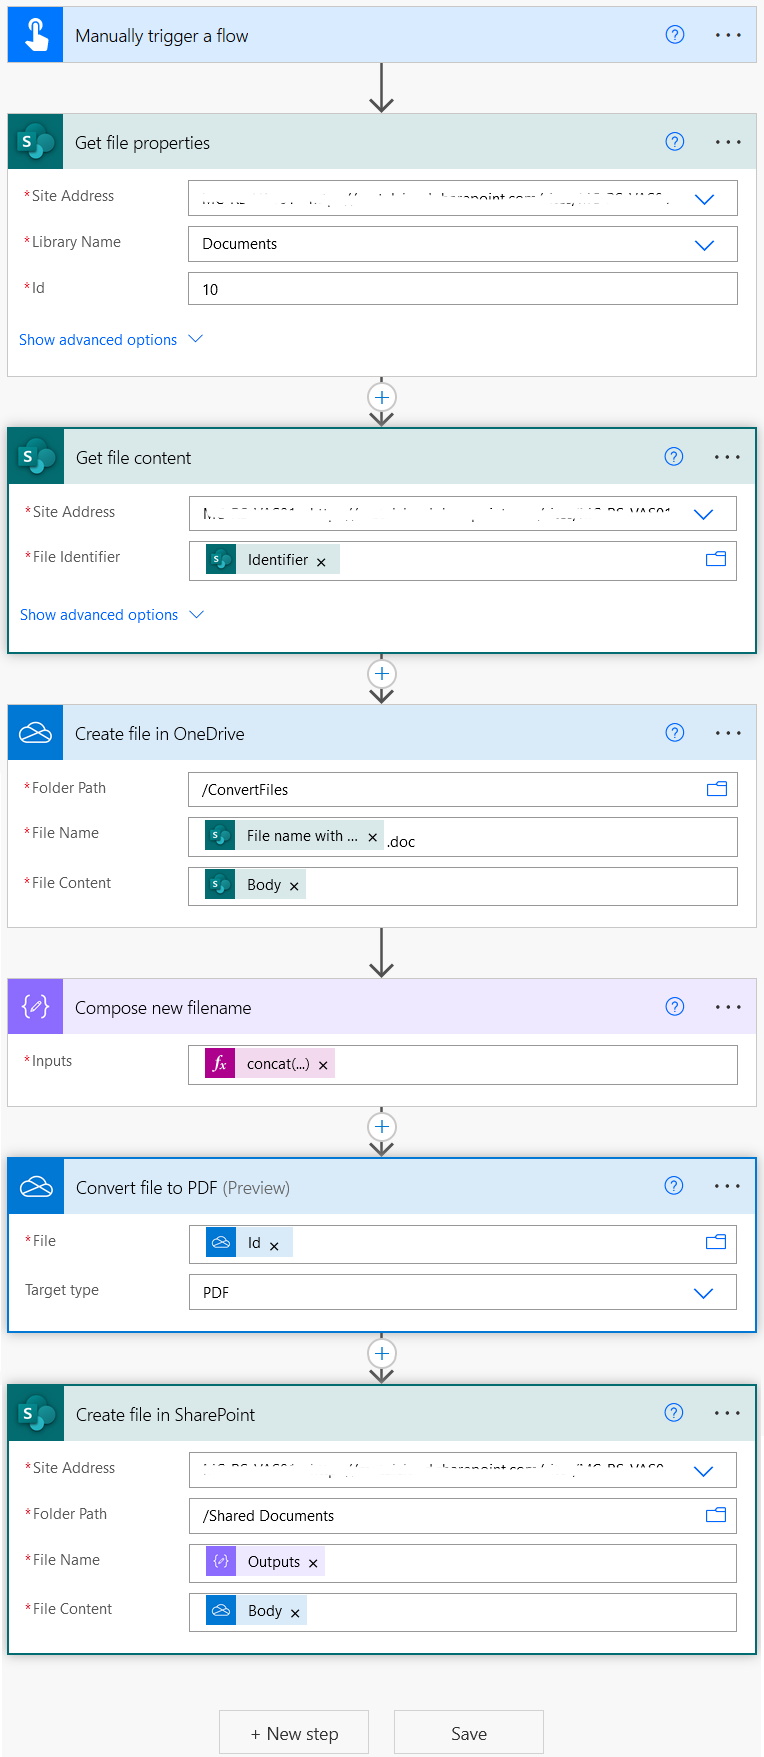
You may get the following error when trying to use the OneDrive for Business Convert File (preview) action to convert a DOCM file to PDF:
message: "Conversion of this file to PDF is not supported. (InputFormatNotSupported / docm)"
If you rename the file to have an extension of .doc (NOT .docx), the action will then work. In the following image I knew my file with the .docm extension had an Id of 10, but you will have to get your Id sensibly from within your flow.
The Expression within the Compose new filename action is:
concat(outputs('Create_file_in_OneDrive')?['body/Name'],'.pdf')
The way content types work in Modern SharePoint has changed. To programmatically add a content type to your list you have to subscribe to it on your site.
Run the following code using the content type's GUID from the Content Type HUB and you should be able to then find it in the sites content type list as before.
                              var sub = new Microsoft.SharePoint.Client.Taxonomy.ContentTypeSync.ContentTypeSubscriber(destSiteContext);

                              destSiteContext.Load(sub);

                              destSiteContext.ExecuteQueryRetry();


                              // List of HUB content type ids

                              List
                                  contentTypeIds = new List
                                      { "[Hub Content Type GUID]" };

                                      var res = sub.SyncContentTypesFromHubSite2("[Site URL here]", contentTypeIds);


                                      destSiteContext.ExecuteQueryRetry();